“I’m a Chicken Hawk!”

Chicken Hawk 1
Not my picture but I love it!

So now that I am an expert Chicken Tender (NOT), I have found that the most important thing you can do for your chickens is keep them safe. Specifically, keep them safe from predators. It is your responsibility and they rely on you to do so. Predators can be anything from house cats, hawks, raccoons, dogs, snakes you name it! Anything that could consider your chickens or their eggs SUPPER.

Before I go into some of the helpful steps that I have taken to keep my flock safe, I will tell you that as a new Chicken Tender… ACCIDENTS DO HAPPEN. Honestly, I must tell myself that because losing any of my bird babies is a direct reflection of the care, I give them.

The first time I lost a bird, I lost all four at the same time. My first four babies. RIP to the Golden Girls. Not even Betty White made it through this one.

Chicken Hawk 2

Not that you can really tell by the picture besides that there is no covering for my chickens, they are not protected AT ALL. This time the predator was a neighborhood dog. He dug a little and pulled back the fencing and got in. He scared two to death, literally, and he got a hold of the other two. It was the saddest day of chicken keeping that I have ever experienced. We had an exchange student from China staying with us and I remember him just standing there watching me cry. I’m sure he figured out right then and there I was a nut… at least when it came to my chickens.

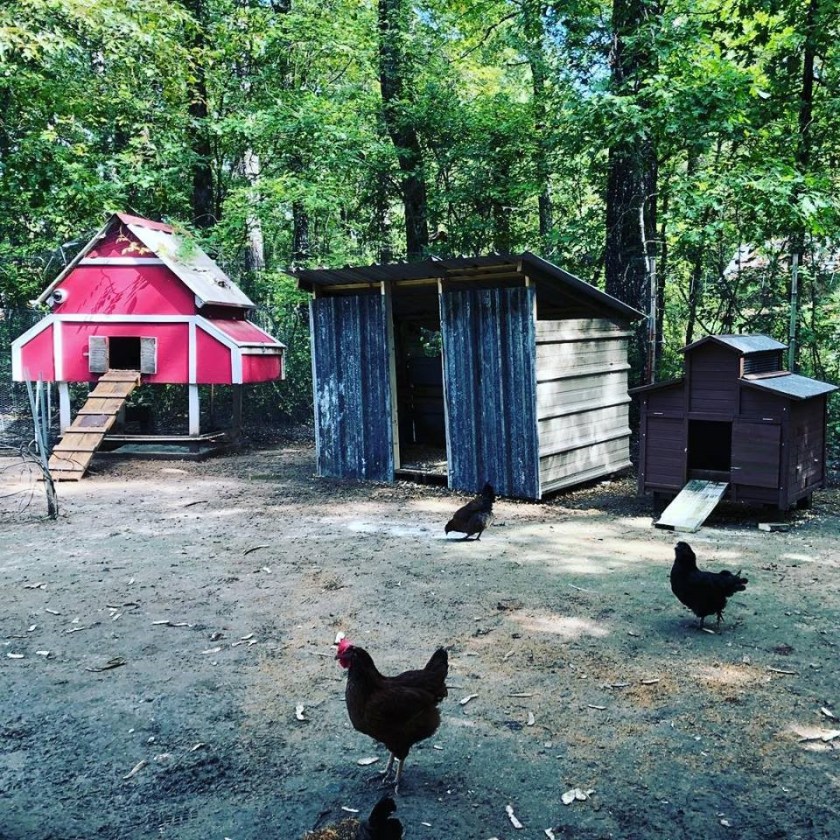
Fast forward to now. I now have 27 birds made up of 20 chickens (one roo), three turkeys (one female, two males) and four Cayuga ducks (one male and three females. Yeah, he is in HEAVEN). I have gone above and beyond to keep these babies safe. I’m sure I over do it. Never the less, I have had an accident or two. We lost three chickens to our own dogs. How, you say? Well, I didn’t even consider that they new babies where smaller and could get out of the ‘smaller than normal size chicken’ hole. Again, completely my fault.

So, to give you some tips on your coop and remember this is my OPINION. There are hundreds of articles and helpful sites that I suggest you research before buying your chickens. Just give it a google. But either way here are my suggestions.

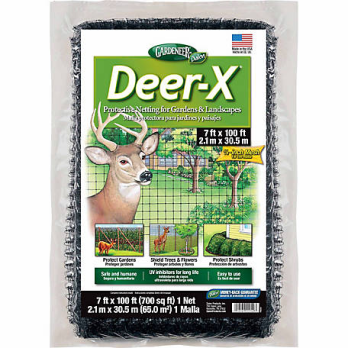
1. Make sure you cover your run.

We have covered our run, which is 50 ft x 30 ft, with deer netting. It was around $15 for one 50ft x 25ft. We bought two and use the remainder of the second one to patch and repair the first one. The netting not only helps keep our flock in, but it also keeps other over head predators out. I honestly thought we would catch a hawk or something but nothing so far!

Chicken Hawk 3

2. Chicken wire is mainly to keep chickens IN

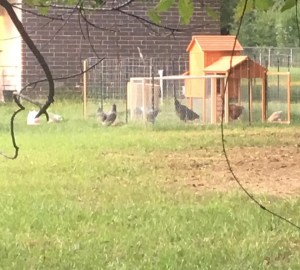
Ok, so I know what you are thinking, because I thought it too, chicken wire is for CHICKENS. Well, yes and no. Chicken wire is perfect for keeping your chickens in, but it is NOT strong enough to keep predators out. It is easily bent and broken if the right stubborn animal is trying to make a snack out of your bird babies. We currently have chain-link fencing for stability and chicken wire on top of that to secure the run. I have used hardwire cloth in the past. It is sturdier and has smaller mesh.

Chicken Hawk 4

Side note: Make sure you cut the wire outside of the run area and pick up any pieces that break off. YOU DO NOT WANT TO DEAL WITH BUMBLEFOOT. (Google if you dare!)

3. Don’t forget to go DOWN

Why? Because the predators won’t. A lot of your predators are diggers, meaning they will dig under your coop walls to get into your coop. I didn’t consider this with my first coop and my babies sadly paid the price for it. We added a third layer of chicken wire that goes out past the bottom of the coop about two feet. This way, if something does dig, it will take them a long time to do so. Hopefully long enough that we notice and can stop them.

4. Please “Mind the Gap”

This right here is why I lost the last three ladies. We have a chain link fence with a normal chain-link gate. I knew the grown chickens were too big for the hole beside the gate, but I never even considered it after transferring the new babies out to the run. Turns out they could just jump right through the small hole. The dog-Os took it from there. Since then, we have covered the hole with a pipe and then a layer of chicken wire that’s held tight with a bungee cord. Not pretty but they are safe again.

5. Get your birds off the ground

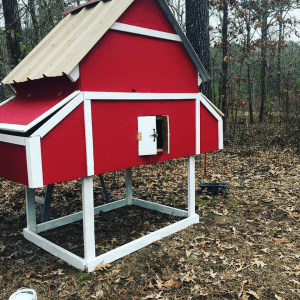
It may be piece of mind, but I feel that the coops being three feet or so off the ground gives a second layer of protection. Not only do the predators have to make it into the coop, they now must figure out how to scale the chicken coop!

Chicken Hawk 5
Red coop is the one they sleep in. We have the one on the ground for the turkeys and the smaller (brown) one for the ducks.

6. PEW. PEW.

I have NEVER had to protect my flock with means of killing another animal. However, I am prepared to do so. You must protect your flock from predators and sometimes it’s either your birds or the predator. I have seen what an animal can do to coop and chickens. The neighborhood dog that killed my first flock, tore the bottom boards of the coop off to get to them. I’m not saying I would have the heart to kill a pet but I would definitely scare the dang thing if I knew it would save my babies.

7. COOP CAM FOR THE WIN!

Ok, this step is optional but so worth it. Yes, we have a coop cam. I used it when we first put the babies in with the established flock to make sure they were going into the coop at night. We caught on video, when my rooster died which ruled out predators. Now if I hear anything outside, I can check on them from my cozy bed. It also helps when I am away and want to make sure my babies aren’t too sad I am gone. 😊

Chicken Hawk 7
Tom keeps watch most nights. He’s our third layer of protection!
Chicken Hawk 6
I’m pretty sure our ducks think they are turkeys.

Chicken Math: Three Chickens Equals Five Chicken Equals 29 Chickens+

What is Chicken Math: “Are sure you are counting your birds correctly? There are specific rules that apply:

  1. You do not count any eggs in the incubator because you don’t count your chickens before they hatch.
  2. You don’t count chickens that were given as a gift because they were a present and are more properly considered a gift rather than a chicken.
  3. You do not count any bird under 18 weeks old because they are too young to lay eggs so they are considered juveniles rather than chickens.
  4. You don’t count bantams because bantams are considered bantams rather than chickens.
  5. You don’t count ornamental birds because they are ornamental and are considered yard art, folk art, or fine art rather than chickens.
  6. You don’t count birds beyond laying age because they’re retired and don’t lay eggs and are considered retirees rather than chickens.
  7. You don’t count birds in molt because they’re are in molt and missing feathers so cannot be properly considered as complete chickens.
  8. You don’t count males because males are for the production of meat and count as a food source rather than chickens.
  9. You don’t count males even if they’re not destined for meat productions because they are protectors of the flock and are more accurately considered guard dogs rather than chickens.
  10. You don’t count laying hens because they produce eggs and thus are more accurately described as a food source rather than chickens.
  11. You don’t count sick or injured birds because they are sick or injured and their disposition is in question so they go on the injured or sick list not on your list of chickens.
  12. You don’t count birds that are for sale or possibly for sale because they belong or will belong to someone else.

Thus, if you follow the rules (and it is always good to follow the rules) you may only count healthy full size female chickens that are not in molt and not a gift and are of laying age but not laying.

Happy counting!” – Borrowed from McIntyre Poultry Facebook Page

Last September, I decided to kick up my self-sufficiency game with chickens. I searched for a coop in my budget range – which was nonexistent – and then I searched for some chickens! Easy peasy, right? Wrong again.

For the coop, I went with a 4 chicken coop from Amazon for around $175 and two-day shipping! That two-day shipping gets me EVERY. SINGLE. TIME. You can see the beauty below.

1
Stock Picture from Amazon

So in two days’ time, I had the waterer, feeder, coop, fencing, food, shavings, and mealworms delivered to my house. My parents came over to supervise the construction of the coop and to yell at me when I held a tool wrong. You know, to make me tough.  We got it together in about an hour or so and it’s a good thing because the next day I was DEFINITELY GETTING CHICKENS. I have NO “HOLD” button. Just go, go, go! Plus, one of the reviews on Amazon stated that a father helped his 6th grader put this coop together, and I will not be shown up by a 6th grader! NOT TODAY!

So, my mom and I set off in my car to go buy some chickens. The plan was to get three… no, four… no, three chickens. So we get there and the man walks us over to a pen and says, “Which would you like?” Of course I said, “I want a black one (mom caught it and put it in the box), a yellow one (the man caught it and boxed it up) and… OOO I want that brown one!” He immediately turns to me, clearly his patience has run thin with this idiot girl buying his chickens, and he says displeased, “You mean the Rhode Island RED one?” That’d be a, “Yup!” We drove home with three boxed up chickens and figured out names on the way which were: Goldie Hen, Chick Norris, and Teriyaki.

2
I added onto the run part of the coop immediately. They needed space to spread their little chicky legs.

A day later, I was a pro! I mean, I kept them alive for a whole day! Now I need to fill that coop. So, I searched and found a little ole man that sold Ameraucana pullets for $30 each.  I bought two grey ladies that I named General Tso and Colonel Sanders. —- Why that high of a price? Well apparently, in the chicken world there are different breeds, like with dogs, and some are considered higher ranking than others. They even have AKC equivalent for chickens, American Poultry Association, for breed standards; who knew?!

Anyhoo… when I got these two home, it didn’t go as smoothly as with the last three. It was just about dark, and I forgot that CHICKENS CAN FLY! And just because you say, “this is your coop,” it doesn’t mean they will abide right away. I opened the box and out they flew! One went one way and the other went another way and I panicked. All I could think was that my $60 went right down the drain. My neighbor came over, after I frantically called his wife, and helped me find the first one that was roosting in a nearby tree. One down, one to go. Since it was dark, and we couldn’t find her, I waited until the next day.

12
(Because I’m extra)

I got home from work and searched all over the yard, and then the woods. While in the woods I looked through at the coop and there she was, hanging outside the coop talking to her friend. Probably making fun of me, recapping the hilarity of the night before and me walking aimlessly in the woods.

3
Facebook post: “I’m in the woods searching for this dang chicken and it’s standing outside the chicken pen?!”

I went straight for her. Dumb move. And then she FLEW. Why I haven’t calculated that into my chicken plans yet, I have no clue. #livingnotlearning So, there she went! She flew onto my house! And then into the VERY LARGE tree in my backyard. I did what anyone at this point would do and decided to let her be. HA! NOT! Who am I kidding? I started throwing anything I could at this heifer; sticks, rocks, more sticks. (I didn’t hit her, so don’t worry, Little One.) I FINALLY scared her down and after another hour of chasing, I just sat and waited. I’m in no shape to be chasing a damn chicken. See Below guide on “How to Catch a Chicken.”

4

That evening she finally roosted in a bush and I caught her! I was so proud, I took a selfie!

6
Side note: It doesn’t take much for me to post a selfie…

If you are keeping count, through the story, you now know I have 5 chickens… at least at this point in. Fast forward to December. I now have a wonderful boyfriend that isn’t afraid of my spontaneousness and actually was excited to get on the Chicken Train with me! He even built me a larger coop, fenced in an area of his back yard and completely covered it with netting. Did you notice the word “LARGER” in that last sentence? I had five chickens and this new and improved coop could hold AT LEAST 30. What’s a girl to do? BUY. MORE. CHICKENS. Of course

.5

Chick Norris died (Totally believe that it was her name. One can’t handle that much pressure.) and bought a new black chick, named Black Chicken. Last month I believe someone ACCIDENTALLY let one of the grey girls and the black chicken out so we lost them too. ☹ But we move on. We decided on babies! Oh yeah, and a friend of mine gifted me our rooster, Roo Paul. He’s fabulous, as you can see.

7
Photo Credit: Emily Peek

As for the babies, I wanted pretty eggs, so I went with the following:

  • 3 Olive Eggers – Green Eggs
  • 3 Black Copper Marans – Dark Brown Eggs
  • 3 Cinnamon Queen – Medium Brown Eggs
  • 3 Barred Rock – Pink/Light Brown Eggs
  • 4 Cayuga Ducks (not sexed) – Grey to Black Eggs
  • 3 Turkeys (not sexed) – Because they are cool and that’s what got the boyfriend on board.

They sent one random extra chick and we ended up with 20 babies. A week into this chick baby madness, one got caught under the waterer and didn’t make it. To fill the void of my lost baby, I immediately went to Tractor Supply for “chicken feed” also known as more baby chicks. It’s a shame they only sell them to you in quantities of 6 or higher… meaning I then added:

  • 2 Sex-links – Brown Eggs
  • 3 Americana – Blue, Pink, Green, Brown Eggs (Notice the spelling change. It’s intentional.)
  • 1 Rhode Island Red – Light Brown Eggs

In conclusion, CHICKEN MATH IS REAL! Once you get one chicken, you can’t stop there. You need more, and more, and more. It’s been a lot of fun so far raising/having chickens and I definitely suggest you give it a try. If it’s legal in your area and all. I also would like to recommend doing a little bit of research just to make sure your babies are safe. Our next step is to try to incubate eggs next spring, which I’m sure will be another adventure of its own. Until then enjoy my baby pictures below!


Cocout Oil Deodorant

Ingredients:

1 Cup of Baking Soda – You can change this amount depending on your sensitivity.

1 Cup of Arrowroot Powder – Found on Amazon

¾ Cup of Coconut Oil – Found at Walmart… they even have organic.

1 Teaspoon of Essential Oil – I used mint and will probably use a mixture next time for a more potent smell. Just make sure you are using a safe for skin essential oil.


Simply:

Stir all ingredients in a large bowl. If using a deodorant container, pack tightly into. What you do not use, make sure to seal tightly and store in a cool place.

I’m A SMELLY CocoNUT…

On my journey of becoming more earth/body friendly, I decided to start using all natural deodorant. This decision was backed up by studies that show aluminum-based compounds in antiperspirants may contribute to the development of breast cancer. I don’t need that in my life sssoooooo added bonus! (I mean main bonus, right? HELLO!)

My sister actually began the process ahead of me but I didn’t know until almost two weeks into my… um… let’s call it my DETOX period.

So I did NO research on this, I just stopped using my normal deodorant/antiperspirant. I’m sure you are totally surprised by lack of research. I decided this on the way to work one day and ran to the Walgreens in front of work and started checking out the HUGE selection of all natural deodorants. All two of them, Crystal and Toms. (Actual selection below)
Deodorant 1Deodorant 2

Crystal was about $1.50 cheaper, so which do you think I chose? YUP! Crystal Essence Deodorant that was a lavender and white tea scent, and off I went! This one worked so well that I still have a full bottle of it. After about day three of being super paranoid, apologizing about possibly being smelling, asking people if I was smelly and telling people to make sure they “JUST TELL ME I’M SMELLY IF I’M SMELLY”, I went back to Walgreens and bought Toms in the tea tree scent. I could tell I was a little smelly, but it wasn’t like when you are 11 years old and your mom decides to tell you and EVERYONE else at the Christmas gathering that “Maybe it’s time you start wearing deodorant?” with a look of disgust on her face. This instance leads you to decide to smell under your arms to see what the heck she is talking about, and you almost die from your own grossness. SHOUT OUT MOM!

About a week passed and I decide to call my sister, Beth, who then tells me she is on month 4 of not using the DEATH Deodorant. She was using some other more expensive brand because it’s highly rated and has 1 million reviews to back it up on Amazon. 1 million reviews that she read, took notes on, and has them organized by type, if I want her to send them over.  She is the complete opposite of me when it comes to decision making. Before she jumps off a cliff, she knows EVERYTHING about jumping off the cliff; the height of the cliff, the speed she will reach before reaching the bottom, how she stops the free fall, how she lands peacefully at the bottom, etc.  ME, I’ve jumped and I’m half way down to the hard ground before I realize, “I should totally take up flying lessons.”  Basically, she is one of the smartest humans I know! In this phone call she tells me that the “detox” period or slight smelly time after stopping the DEATH deodorant HAS NOT PASSED YET FOR HER. What the heck am I getting myself into?? I WILL BE FOREVER SMELLY?! But don’t forget… ALIVE.

Around 3 months in, I found a natural deodorant by Arm & Hammer Essentials Fresh Scent. THIS ONE WAS MY FAVORITE and less than $2.00. WINNER, WINNER! I started using this every morning and every now and then, about mid-day, touched up with the Tom’s I had left over in my purse. It’s totally normal to carry deodorant in your purse…

Deodorant 3

Finally, after eight months, I’M NOT SMELLY and it’s time for phase two; make my own deodorant. Hey, it makes sense to me! After a bit of research, (also known as: one quick Google search of homemade coconut oil deodorant) I was on my way! I LOVE the scent of coconut, so uneducated me went this route. YUM, or so I thought.

Side note – No scent of coconut… Wah. Wah. Wah.

Now for the update on the Coconut Oil Deodorant:

Meh.

That about sums it up. The first two days it caused my lymph nodes to swell under my arms (the article warned me about that) and the application is a bit messy. It breaks apart when you are applying it, and you kind of have to rub it in. :/ On the upside, I didn’t smell or sweat like a crazy person as I thought I would. I decided to skip a day to see what would happen too. AND NO SMELLY SWEAT happened. JUST DON’T GO THREE DAYS because… HELLO SMELLY!

My plan is to continue to use this until it runs out and then I will change up the recipe a bit and give it another try.

Here are the ingredients I used: Cocout Oil Deodorant

  • 1 Cup of Baking Soda
  • 1 Cup of Arrowroot Powder
  • ¾ Cup of Coconut Oil
  • 1 Teaspoon of Essential Oil – I chose mint!

Deodorant 4

Don’t worry… the coconut oil melted in the car. It’s back to normal white semi-solid consistency now!

I just mixed all the ingredients up and packed it in the TINY deodorant container and let it sit overnight. I put the rest in a plastic tub and stored it in the refrigerator for later.

Deodorant 5

So, my revisions are as follows:

  •   ½ of the backing soda – to hopefully prevent my glands from swelling.
  • A different, or additional, scent so it SMELLS like ANYTHING!

I’ll keep you posted on the new set up!

If you are curious where to buy the ingredients or the TINY deodorant containers – AMAZON!

Just know that if you decide to take part in this process of going with all natural products, it takes time. Your body has been conditioned to the products you use now for HOWEVER long you have been using it. For me, that’s around 16-17 years. It takes a minute to get all that out and for your body to get used to the new. GIVE IT A SHOT. And by a shot I don’t mean a weekend… you know who you are! -_-

Can’t wait to hear how your process went!

Thanks for reading, Loveys!


Payton

Natural Vegetable Garden Pesticide


1 Medium Onion (chopped)

4 Cloves of Garlic

20 Drops Peppermint Essential Oil

5 Cayenne peppers

2 Tablespoons Baby Shampoo (per gallon of water) – can be substituted biodegradable liquid soap

1 Gallon of Water


Throw onion, garlic, and cayenne peppers in food processor and pulse. Once it is blended, add in peppermint oil.

Use gallon jug and mix garlic/onion/pepper/mint mixture with water and allow to sit in the sun for one day. Strain the pieces/chunks out and add baby shampoo or biodegradable soap. (Make sure you strain well, so it doesn’t stop up your spray bottle.) Fill jug up the remainder of the container with more water and shake.

Fill spray bottle and spray plants 1-2 times a week.

Wash vegetables after harvesting to avoid having a soapy mouth. 🙂

Tom-ay-to, To-mah-to

It’s TO-MAY-TO, DANG IT, and it does matter.

I LOVE tomatoes! So,  naturally, when I started my ‘growing at home’ venture I started with tomatoes and a few easy peasy herbs. With all that, I didn’t start from seed and bought at the local Wal-Mart as young plants. I’m on my third season/year of growing stuff and I feel that each year my garden and my need to learn is expanding. The first year, 2015, was a flop. I had maybe ten tomatoes from my two tomato plants that were in containers and the plants shriveled up around July. That was the end of that tomato show!

The next year, I moved and had more room to actually plant things in the ground. I planted around six or seven tomato plants, two squashes, two broccolis, two cauliflowers, six okras, two watermelons, one asparagus, four peppers, six lettuces and my trusty herbs because Wal-Mart has this power that when I go in it makes me feel like I MUST have ALL. THE. THINGS! Seven types of basil? OF COURSE I NEED THEM! It’s like I pass through the automatic door of the Garden Center and I hear “Gotta catch ‘em aallllll” ringing in my ears. Ok, 2016 Garden, I thought I was a professional at this point. I mean I had ten tomatoes the previous year… Did I mention I put these twenty or so new plants in a 4’x6’ plot? Let me tell you, this year the plants didn’t exactly “thrive”, to say the least. I’m sure it was the heat or something?

A2

Anywho, that year I ended up only having fruit from the tomatoes, squash, lettuce and peppers and everything else died or so I thought. It turns out asparagus takes two to three years to produce. Jokes on me! I now have an asparagus plant that looks like a house fern that is four feet tall.

A3

My tomato plants lasted until about July again but they were taken out by the infamous tomato villain, the HORNWORM. They filled their fat bellies and took my plants down to twigs within two days. Here is a picture from a Facebook group that I mention a little later.

A4
We all have the same hatred for this guy…

So, this year my garden has grown, again. I have spaced things out a wee bit better and I have condensed down my plant choices. Sometimes in my spare time, I practice self-control for fun! I now have twenty-six tomatoes, nine squashes, seventeen peppers, ten okras and my herbs. I have twelve herbs but they really don’t count since they aren’t planted in the “garden.” Ok, those numbers don’t really read self-control but whatevs.

A5

My main goal this year was to learn more about tomatoes so that next year I can start them from seed and really be on top of my tomato game. So, I planted my tomatoes and THEN started my research. The list of tomatoes I planted in my garden is below.

Roma Tomato (D)

Arkansas Traveler Heirloom Tomato (I)

Chocolate Sprinkled Tomato (I)

Cherokee Purple Heirloom Tomato (I)

Grape Tomato (I)

Indigo Rose Tomato (I)

Husky Cherry Tomato (I)

Pink Brandywine Heirloom Tomato (I)

Sun Gold Tomato (I)

Tomayto, Tomahto
Harvested so far this year, 2017.

If you have noticed the “D” and “I” after each of the tomato names, I’ll get to that. Apparently, it’s kind of important…

To start my research, I did as any intelligent millennial would do and I went to social media! I asked to join GROUPS. ALL. THE. GROUPS: gardening groups, tomato groups, edible plants groups, mushroom groups, and homesteading groups. Basically, any group that may give me the upper hand on fighting the ‘death and non-production’ monster this year! I found one tomato group that I love that is simply named, “Growing Tomatoes” on Facebook. It has over nineteen thousand members that live all over the world. Please go join this group if you have questions about any step of the tomato growing process. These people are great and a lot of them are beginners like me! First thing I learned was about the dreaded hornworm and how to organically combat the little devil with a cayenne pepper spray. I had a few cayenne peppers already so I pulled them off, diced them up, got a spray bottle, filled it with water, added the diced cayenne peppers, onion, garlic, mint and lemon balm oil, and let it bake in the sun for a week. It put my little mind at ease so I was set… so I thought… The next week or so I noticed that there were spiders, some type of bug eggs, and ants all over the garden. So, I gave up on the organic route and bought some Sevin Dust. Now that stuff works! As far as I am concerned, so far, I have the pests at bay. (I learned later, LATER being now when writing this, that I missed an important ingredient in the homemade solution; SOAP)

ORGANIC PEST CONTROL GARDEN SPRAY RECIPE

(Recipe Instructions HERE)

1 Medium Onion (chopped)

4 Cloves of Garlic

20 Drops Peppermint Essential Oil

5 Cayenne peppers

2 Tablespoons Baby Shampoo (per gallon of water)

1 Gallon of Water

When I was at our Fourth of July celebration, I overheard a family member mentioning something about planting *ROMA* tomatoes again for the fall. Which made me panic because here we are in July and I haven’t planned for a second crop! So, then I start looking at places to purchase tomato seeds.

On the Googs Machine, I found the Willy Wonka Chocolate Factory equivalent to tomato seeds stores, www.tomatofest.com. There, I learned there are HUNDREDS, I repeat, HUNDREDS of kinds and more importantly COLORS of tomato plants. (Que Pokémon theme song again.) After buying eighteen, yes you read that right, different varieties, I was prepared to start a few little seedlings and ready for the FALL CROP! After buying, I decided to do a little research on the types of tomatoes I bought. If you are noticing a trend that my follow through is always ahead of my research stage, you are not alone. I noticed that on each of the descriptions of the tomato plants they were marking them as Determinate and Indeterminate. See, I told you that I would get back to that. What I figured out was when a tomato plant is considered determinate, it means it stops growing once the top bud produces a fruit and the plant is DONEZO! Indeterminate is the opposite and basically it continues to produce all season long. My family member is replanting for the fall because she only planted ROMA tomatoes which, if you look at my list again, is determinate. So, what that means is that I didn’t need those new eighteen tomato seed packets I hastily ordered.

*Sigh*

With my new-found knowledge, I decided that I would store the new seeds for next year and try starting tomato plants from seeds in the spring. Here are a few of the stock photos for my new seeds and something to look forward to!

Thank for reading, Loveys

Payton

Blue Berry Tomato (I)

A7

Super Snow-White Tomato (I)

A8

Anas Noire Tomato (I)

A9